Brownells BRN-180 Build: Part 6 Assembling the Lower Receiver

This has been such a fun project! I have had all of the parts needed to assemble the lower receiver, with the exception of the grip, for a long time now. After spending weeks on the custom wood grip, and finally finishing it I was so stoked to be able to complete the lower receiver and put the newly completed grip to good use.

Here are all the parts I choose for the BRN-180 lower. Obviously, the Brownells BRN-180 lower is at the heart.
You can find the BRN-180 lower receiver at the link to Brownells below;
I opted to use a lower parts kit from CMMG; I had never built a lower with one of their kits, but my initial impression was good.
You can find the CMMG lower parts kit at the link to Brownells below:
I have tried so many different drop-in AR-15 triggers and so far to this point, my all time favorite drop in trigger is the Rise Armament RA-535. Eventually, I plan on doing a side by side review of all the drop in triggers I have, but for now I will say the RA-535 has the cleanest and shortest break and reset out of the whole lot.
You can find the awesome Rise Armament RA-535 trigger at the link to Brownells below:
Brownells/Rise Armament RA-535
The last two components to the assembly of the lower receiver was the custom wood grip and the longer custom grip screw.
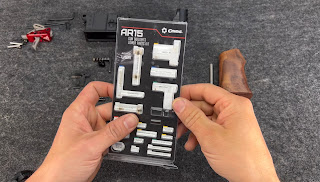
The CMMG lower parts kit comes in this plastic packaging, with all of the parts individually labeled and separated. I have a love-hate relationship with the CMMG packaging; it is nice to know when you receive the kit you can quickly see every requisite part is accounted for. . . . but, that's pretty much where my love for their packaging ends. It was one of those plastic packages which is crimped around the entire 3 sides which made it very difficult to open. And, after you have built a few AR's you no longer need labels on everything to figure out what goes where.
Before I dive into my assembly process, I think its important to note, everyone has their own way of putting together an AR, and my way might not be your way or the best way, but I find it works well for me.

The way I always like to start my lower assemblies is to group all of the lower parts into small like categories. For example; I will group the take down pins with their associated springs and detents etc. Doing this helps me speed the assembly process up and keep things neat and organized. I also prefer to start at the very front of the receiver and work my way to the back.
I start with the forward takedown pin and I find this Brownells "Pivot Pin detent installation tool" to be super helpful


The tool is a cylindrical "L" shaped bar which has a hole in one end. The tool fits perfectly into where the forward pivot pin resides. Basically, you push the tool into the lower receiver and use the hole to drop in the spring and detent.

After inserting the spring and detent, you depress them downward with the supplied Allen wrench, and turn the tool which locks the spring and detent down. 


After turning the tool you take the forward takedown/pivot pin and replace it with the inserted tool.
A friend also has recommended to use a thin razor blade between the tool and the detent to help keep things in place when you swap it out. Also, I always apply a bit of oil to both the pivot pin, detent and spring and pretty much all the parts prior to installing them.
If you want to purchase this pivot pin detent installation tool, you can find it at the following link to Brownells;
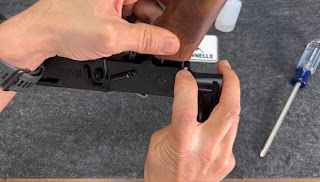
Next I install the magazine release. This is pretty straight forward; I just install the back plate/magazine catch, place the spring over the rod, push the button into place, and start spinning the back plate/magazine catch around until it's completely threaded on.
Next up is the bolt catch/release lever with its spring, detent and roll pin. I like to cover the receiver with painters tape to protect the side of the receiver. 


I like using this Brownells flat bolt catch pin punch. It is flat on one side so you have more space to drive in the roll pin without marring the receiver.
You can find this punch at the following link to Brownells;
A little trick I've learned which helps me, is I use a piece of electrical tape to tape the roll pin onto the end of the punch. This keeps the roll pin in place while you start to drive it in.
I also find it helpful to use a small Allen wrench inserted on the opposite side to hold the bolt catch in place while driving in the roll pin. The Allen wrench just gets pushed out by the pin.
Before installing the trigger, I place the safety selector in its hole. If you install the drop in trigger before the safety selector the selector won't fit.
Next up is the trigger; as I recently stated, I opted for the Rise Armament RA-535 drop in trigger. It comes with some very nice hardware (anti-rotation pins), which have one which is threaded and another which has a small flat blade. 

Next, I use the included (two) torques wrenches to tighten Bothe sides of the screws.
Because of this design, the trigger comes with two plates which have a hole on one side and a slot on the other. So you just have to decide if you want the screw part to be towards the front/top or the rear/bottom.
Since the BRN-180 upper does not utilize a buffer tube or endplate, the rear takedown pin spring and detent are retained by the grip, in a similar way the safety selector detent and spring are retained.
After getting the springs and detents into place, the last step is to push the grip straight down as to not bend the springs. 


Once the grip is pushed into place, the very last step is to tighten the grip screw.
Lastly I inserted an empty magazine to check the magazine catch and release.
And then utilizing the Brownells Hammer Drop Block (to protect the receiver) I tested the functionality of the safety and the trigger.
You can find the Brownells Hammer Drop Block at the following link to Brownells;
Everything worked perfectly.
Since everything worked as it should, I was able to put the upper onto the lower. I really love how it looks all together; but its nowhere near where it will be when it's done! So, stay tuned because more custom stuff is to come!
The BRN-180 upper can be found at the following link to Brownells;
Remember, Faith Kills Fear!

Comments
Post a Comment