It operates via spring loaded power and as you pull the trigger back with the lever, it pulls the yellow tab up with the black tab.
Once the trigger breaks, it releases the black tab to the zero position and the yellow tab remains at the triggers weight mark. It is reset by simply sliding the yellow tab back down to the zero mark where the black tab is waiting and you are ready for another trigger pull.
I used the Wheeler trigger pull gauge for a long time and I still own it. For $20 or so, it is a great option and a really handy tool on the gunsmithing bench. But when you start watching your collection grow and you start helping others with their guns and triggers, the best tools are. . . . well, the best! Which is why I decided to head back over to Brownells and buy the Lyman's Electronic Trigger Pull Gauge.
If you want to skip the review and just buy the Lyman Electronic Trigger Pull Gauge you can find it through the following link to Brownells.com
The Lyman Electronic Trigger Pull Gauge comes in a very nice hard plastic case which is filled with a soft foam material cut out to hold the gauge securely. I wasn't expecting this and it was a nice surprise. The case snaps shut and is a nice way to store the tool when it's not being used.
The pull arm slides into the gauge when not in use making storage much more compact. When you want to use the gauge, you simply pull it out and it can be locked into position at every 90 degree point. To change where the pull arm is positioned after it has locked into place, you simply push the arm in a bit and it can be turned again.
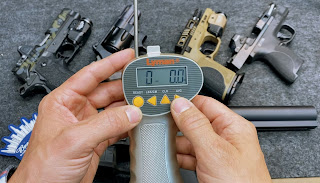
The Lyman Electronic Trigger Pull Gauge features four clearly labeled buttons and the tool is rather intuitive and easy to use. The first button is the ready button. This button is the button you push to "wake up" the gauge and the last button you push just before performing the trigger pull.
The second button will change the units of measurement from standard to metric. I tend to leave this button alone as I only use standard units.
The third button is the reset button. This button is basically the start fresh button and it should only be pressed when you want to start measuring a different trigger, but I will add more on this later.
The last button on the far right is the average button. After performing up to 10 trigger pulls, you can press the average button and it will automatically calculate the average of the trigger pulls.
So to recap; you simply pull out the gauge, pull out the handle and position it to your desired angle and pull out a bit more until it locks into place. You then push the ready button to wake up the gauge. You then will push the ready button again and the unit will give a single beep sound and you are ready to perform your first trigger pull measurement. Make sure you line up the arm nice and parallel to the frame/receiver/stock and perpendicular to the trigger and pull nice and slow and steady. Do not pull fast or jerk the trigger with the gauge. After the trigger breaks, you can push the ready button and it will reset the trigger gauge to perform another pull test, but it will not delete the last pull weight measurement. You can repeat this up to ten times, but if you go to the 11th pull by repeatedly pushing the ready button it will delete the 1st as it only retains the most recent 10 pulls. Obviously, you don't need to do 10 pulls; you can just do one or two or three and then push the average button.
A word of warning; be careful while trying to obtain an average to not push the ready button when you have not performed a trigger pull because it will record the zero pounds as one of the average measurements and will be a wrong outlier, falsely lowering your overall average.
For my tests, I decided to collect a wide variety of triggers; A 2011 SA trigger via the Staccato C2, a revolver SA/DA trigger via the S&W 327 Nightguard, a aftermarket Apex tactical trigger SA trigger via the S&W 2.0 compact, a stock (besides a polished sear safety plunger) striker fire SA trigger via the S&W Shield Plus, and a AR-15 single stage trigger via the Rise Armament RA-535 trigger in a Radian Lower receiver. For each trigger I performed three pulls for a nice quick average.
I started with the Smith and Wesson Shield Plus (Customized by Floyds Custom Shop and myself) and for a stock trigger which is not yet broken in, I was happy with an awesome crisp 4 pound 7 ounce average.
Next up was the Smith and Wesson 2.0 Compact (Customized by Floyds Custom Shop and myself) equipped with an aftermarket Apex Tactical trigger. This trigger produced an exceptional 2 pound 10.4 ounce average. If you have not yet experienced and Apex'ed M&P 2.0, you really need to. It is the best striker fire trigger I have ever felt.
Next up was the rare Smith and Wesson 327 Nightguard (Porting work was done by Magna-port, and a gunsmith performed a trigger job and spring kit). I tested the trigger first in DA and then again in SA. The DA was a very respectable and smooth 6 pounds 13.9 ounces; and the SA was a crisp 2 pounds 8 ounces.
The last pistol was the Staccato C2 (Customized by Vulcan Machine Werks and by me. I stippled it myself and am thrilled with how it turned out.
The C2 has an amazing SA trigger which is synonymous with other 1911's. The trigger has not yet fully broken in but weighed in at a very nice nearly exact 4 pounds.


Lastly, I tested the Rise Armament RA-535, housed in the Radian Model 1 lower receiver. I use the very handy Brownells Hammer Drop Block which I featured in a previous post.
The RA-535 trigger is amazing, and I highly recommend it. Although while I was testing this trigger I inadvertently pressed the ready button twice which recorded a zero pound reading and effected the average, but I have measured the trigger before and it weighs in at 3.5 pounds. I plan to do a whole post on just this trigger, so you will all just have to be patient for that.
I love this tool. As a self admitted trigger snob, I am constantly swapping triggers out and am always finding joy in seeing the results down to the exact and precise weight. The Lyman Electronic Trigger Pull Gauge can measure as little as 1 ounce and at most 12 pounds. If you have a terrible stock trigger which is more than 12 pounds, just do yourself a favor and upgrade the trigger and use this tool after. At the time of this writing, the Lyman Electronic Trigger Pull Gauge is listed at $59 which is a great value in my opinion. I hope you enjoy this tool as much as I do! let me know if you have any questions.
If you want to see the video review of the Lyman Electronic Trigger Pull Gauge you can check out the YouTube video at the following link;
If you want the amazing apex trigger for the 2.0's you can find it at the following Brownells Link;
If you want the awesome Rise Armament RA-535 trigger you can find it at the following Brownells Link;
Remember, Faith Kills Fear!


Comments
Post a Comment