Brownells BRN-180 Build: Part 5 Custom wood grip


(Photo courtesy of Morphyauctions.com)
I saw that AR-18c and loved it! While I knew I didn't want to make an exact replica, I thought some beautiful walnut would look awesome on the BRN-180.
If you have been following along on this build series, you'll know I finished the lions share of the wood grip and only had the finishing work left to do. I knew I didn't want a lacquer tape finish. I went onto YouTube and I found an old school stock maker who used the only light sanding, his bare hands and boiled linseed oil to finish beautiful wood rifle stocks. I liked this method and decided to follow it.


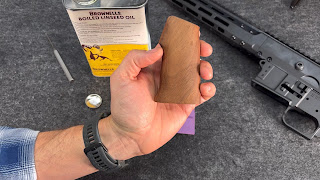
I started by sanding the grip with some 320 grit to get it to a very smooth finish.

I went on to Brownells and found this Boiled Linseed oil. I have yet to be disappointed by a Brownells product so I decided to give it a shot. Interesting enough, Brownells sells one pint of this stuff for $25 and one quart for $30. I figured for $5 more I should just get the larger container, but you use so little when applying it will likely be passed down to my grandchildren.


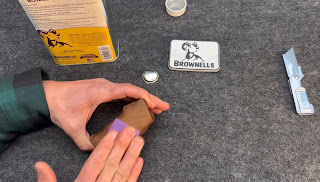
I applied the Linseed Oil with my bare (warm) hands and then sanded the oil in with some 400 grit sand paper. The idea is to use the oil to sand the wood dust/oil into a slurry which would fill in the small voids, gaps, and imperfections. And after multiple coats, eventually a sheen would start to develop.


After the first application the wood was looking very beautiful, but I wanted it a bit darker and wanted to have a nice sheen. And it was recommended to apply three coats no matter what as to properly protect the wood.

After the second application it was looking better but you could still see is was a matte finish.

After the third application, the walnut was looking darker and started to develop a sheen.
For the fourth application, I switched to a 1000 grit sand paper to try and polish the wood.


After the fourth application the wood took on a dark and beautiful sheen but it still was not exactly where I wanted it to be.


I didn't know it until I had finished the fifth application, but it ended up being my final application.


The final product has a beautiful sheen, but is not shiny, and is buttery smooth and looks gorgeous.

Looking back and comparing it to the original grip blank I got pretty far on before screwing it up and needing to start over, I am very proud of how it turned out. It really has come a long way, and was more work than I had originally anticipated, but I actually really enjoyed it.
I have done lots of wood working over the years but this was my first attempt at making custom wood gun parts/furniture. While I am no professional and there are certainly flaws, I love that I now have something one of a kind which is beautiful. If you have the time and means to make some custom parts for your own guns, I highly recommend it. Not only will you end up with some cool stuff, but it adds a sentimentality to you guns which will mean a lot to your kids someday.

Now that the grip is done, I can assemble the lower receiver and then move onto the next really cool custom piece. Stay tuned!
If you want any of the stuff you saw today you can find them at the links below. It helps me out when you purchase your build parts through those links, so thank you in advance!
Remember, Faith Kills Fear!


Comments
Post a Comment